Sunday, March 3, 2013

Ohhh those deadlines...

Necessary supplies to make it through a long night of
painting. Popcorn, caffeine, cabernet, reference photo
and spoons to play on break.
T
I started to gesso my next piece for the show. With it fast approaching, I'm feeling a little behind. This figure will be positioned inside an 8 foot long boat that I have made out of foam. I wanted her to look as if she is almost falling out of the boat because it has recently broken wheel.


This is just a picture of the foot drying over the trash can.
Sometimes the foam isn't available in a wide enough size. When
that happens I have to glue the foam together to make it wider
or taller. 


Thursday, February 28, 2013

BFA Show Card


This is the card for my final BFA show. March 19th is right around the corner. This weekend will be dedicated to making a lot of art and getting everything ready.

Tuesday, February 19, 2013

Chonchitos!!!

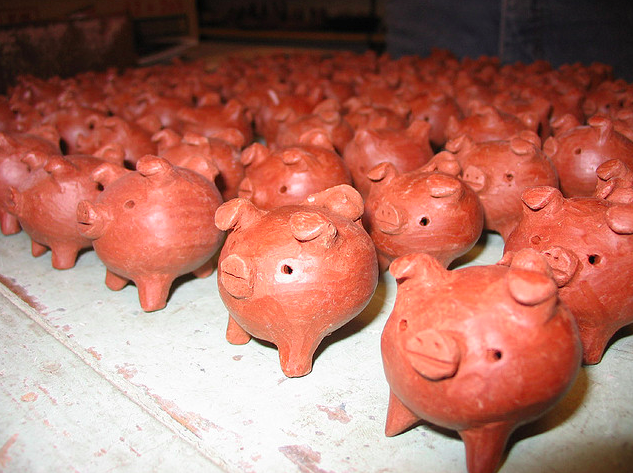
Chanchitos is Spanish for little pig. The chanchitos from Pomaire, Chile are good luck charms. Their distinguishing characteristic? They only have three legs. 


This is my first attempt at making my own. It needs some work. 


These are authentic chanchitos. Jeremy Datillo, Stephanie Hamilton and I are going to use these little guys for a show about superstitions and good luck charms in which we battle it out to cancel the good with the bad or the other way around.


Although it was on my grandfather 3g IPhone, this is the best photo I have ever taken. It has nothing to do with chanchitos. It is just included for its awesomeness.

Newest Painting Installation of Horacio Quiroga's Stories

One thing that I have learned this week is that I should do more planning. 

Lesson #1- When you buy an old wagon on CraigsList, ask how big it is. I drug a friend out to the middle of nowhere to spend two hours  disassembling it with me to realize it still wouldn't fit in my van.  Now I get to drag my professor and his saw out there to retrieve the remains. 


Of all things, I needed a yoke for a horse. For some strange reason my professor just happened to be getting rid of one! 


Lesson #2- If you want to build a boat, do some research. After building this lopsided frame, I realized the luan plywood could not even bend that much. I destroyed it trying to put it together and loaded it up to throw it away, which led to the following...


Lesson #3- Check and see if the elevator you are using is working. This was me after the 10 minutes of cussing, kicking and being trapped in the corner of the elevator. The motion sensor on the elevator door was not functioning...at all.


I need to take a photo of this installation when it isn't terribly backlit but for now he is a sneak peek at what is going on. I have been combining a few moments from stories by Horacio Quiroga so that I can illustrate them as I imagine with found objects and paintings.


A man dragging a turtle into his house with intentions of eating it. 

Monday, February 11, 2013

Distressing Wood and Building Boats


I wanted to use distressed wood to set the mood in my next installation. Old barn wood is expensive and hard to find so I decided to simulate it. I bought about 12 pieces of picket fence that were about 4 foot long. I used the belt sander to smooth down the corners to make it appear worn down. Next I used the belt sander to sand little groves in places. The fun part was next. I used a hammer and a chisel to basically beat the down. I used the back of the hammer to splinter the top and put notches in the surface and the chisel to scratch the wood up. I also hammered a bag of screws on top of the wood to create little indents. 


After I finished that I used a dark oak stain and barely brushed it on the wood with a sponge brush. Next I used a light maple stain to fill in the gaps.


After that I mixed up a gross-looking blue green using Cerulean Blue and Raw Sienna acrylic paint. I watered it down and applied it with a sponge brush.


Finally it was time for construction. This is the beginning of my installation. 


                                    It will include this painting which is in progress in this photo.


The next part of this project is to build a small, rough canoe with wheels being pulled by a horse. This is the beginning of the construction. It still doesn't look like much but I am on my way to do some more building as soon as I post this!

Sunday, January 27, 2013

Measuring Time


I've spent the beginning of my last semester at Indiana University Southeast experimenting with new ideas and processes. I am continuing to follow my interest in the perception of time and the way that we measure time. This gear was printed on a 3D printer by Brian Harper. We are currently working on making our own clocks so that we can measure time in a new unit. Not using the minute, hour or second gives the opportunity to create a new unit. The standard time unit measures the movement of the sun. When not measuring the sun, a new unit can be created and utilized. Now to pinpoint what to measure.


The 3D Printer


This is an experiment for another project in which I am working with the perception of time. The canvas bag has sand in it to reference an hourglass. As the sand runs out the pliers on the other end of the string lowered to the floor.
After experimenting I used a clock on the opposite side of the string instead of pliers. When presenting this piece I want to set the alarm clock to start sounding as the sand in the bag runs low. As the clock lowers it will dip into a bucket of water, shorting out the clock and shutting off the alarm. The hourglass is an old, inaccurate way to tell time. As clocks have advanced, they have become more accurate. Our lives have become faster paced as we can become more demanding of other's punctuality. Clocks often represent time passing in our lives. The clock in this piece is a symbol of a lifetime, one that was ended by circumstances beyond their control. The amount of time that the sand takes to run out adds suspense to the final piece. Suspense is something that changes our perception of time


Tuesday, November 20, 2012

BFA Painting Critique

 I had my next to last BFA critique last week. I had a lot of helpful feedback and I'm ready to use it for my next two pieces. Here are some photos of some of the work set up.


A photo that Brian shot during my critique.

This is my newest painting. It is still in progress.


Breaking things on accident and on purpose.

I finally figured out why my pots were cracking! Apparently this little guy was to blame. He looks vicious enough.

These are the two pedestals that I made for my ceramic work. They aren't going to be just normal pedestals though. 


This is a practice run for the ceramic work that I will be putting into our BFA show. I am still working with the concept of time and how it seems to slow down during an accident. I cut a triangle out of the base of this pedestal and tied a string to it. At first the pedestal appears to be normal. When I tugged the string the triangle shaped corner pulls out from the base and all of the pieces begin to topple over with the pedestal.
The piece ceramic work for the show will be much simpler. There will be 16 pieces that stack straight up. I am going to film the work breaking and have it playing on a projector behind the fallen pedestal.

This is a ceiling fan motor that I have now wired to a dimmer switch to slow the motor. The fan is then wired to a plug in that is attached to a remote control receiver. I will be able to turn this motor on and off with a remote. On top of the pedestal will be a stack of bowls with a string through the middle that attaches to an arm on the motor. As the motor turns the bowls will collapse over as the string has slack and then sit back up. I want to display this at our BFA show and turn it off and on to make people think that they have knocked over the work. My hope is that I will have the ability to make people experience the slowing of time with the push of a button on a remote control.

Train Kiln

 We had our second wood fire in the train kiln that we built last spring. We even fired it off in 18 less hours than the last time. Drier wood, awesome workers and a good rhythm were a big help.
We carefully loaded our work into the kiln. Keeping the pots close together directs the flame through the pieces which creates the colorful patterns when it is finished.
Megan, Dan and Ian kept loading as the sun was setting.
Throwing in the wood gets pretty toasty when the temperature nears 2000 degrees.


Jay kindled through the wee hours of the night.
When the kiln was unloaded, we had a Space Lab show to display our work.

It is customary to make kiln gods to protect our pots through the firing.

This is some of my work from the firing.

Sunday, October 28, 2012

Train Kiln Preparations and Silverfish.

I've been painting these silverfish. I decided to paint these silverfish while thinking about site specificity. I have about 15 more to make before I'm finished. They will be crawling up the pillars at the Mammoth where we are having a BFA off campus show in December. The interesting thing about silverfish is that they shed their exoskeletons several times throughout their lives. When they shed this skin it can ruin clothes and clothing. They are gross little things. I want to sculpt a silverfish and then cover it with tinted glue and peel it off to leave in a pile at the base of the pillar on the floor.

Today we split wood in preparation for our firing this weekend. We are ready for firing after splitting the wood and repairing the kiln.

This is about half of the wood that we split today.


Today was my first time using a wood splitter. It was much better than using an axe.
At the end of the day I was ready for my pajamas, slippers and some hot tea.

Monday, October 22, 2012

Earnest Bowls and Leaving the Walls Behind

      Ian Shelley and I had a good chat on what an earnest wood fire bowl looks like. So I spent the six hours of my class time this week trying to make one. I paid a lot of attention to the relationship of the rim to the foot and also the throwing lines that I left on the side.

     I gave up on white stone ware and half porcelain/half stoneware and tried using gold art alone. It is the best that I have used so far. It is smooth but holds up well. It feels a little stiff at first but I really haven't felt as comfortable with any of the other three clay bodies I've used this semester.
 A new glaze recipe that I tried out didn't turn out so hot. The pitcher on the left turned bright dark red in the thicker areas. It is a half porcelain clay. I was expecting that color but a little more on the purple side. The little shape on the right turned green with hints of purple. It is made from a white stoneware recipe.
    This picture isn't very good. I am going to take some photos with a nice camera tomorrow and hopefully replace these. The important part is that my paintings stopped using the wall this week. The figures are hanging from the ceiling ant the walls and floor are made from foam. It only took 44 hours to make it happen. There is another piece that is mostly completed but this one took the most work.

     The figure on the right isn't quite where I want him because I am limited by the dropped ceiling at school. There will eventually be a rug that spill out of the dark carpet and breaks up the line across the bottom as well.

     There will be quarter round on both sides of the carpet at the bottom and the one that is there needs stained.

     Those are the only two things that I have planned to do. I'm finally almost finished with it!!